Gatsby基础知识(中)
这篇文章主要是翻译和记录了一些 Gateby 的基础知识,有助于开发者通过这些基础知识进行快速的开发
Refer to the Article: https://mpolinowski.github.io/gatsby-js-knowledgebase
06 属性传递(Passing down Props)
现在,我们可以从父组件传递属性到Counter组件。例: 我们可以通过显示的页面来更改我们的Counter 标题。
6.1 更改头部
<Counter header="This is the Index Counter" />这个header的属性现在可以用在Counter组件中的render方法。现在我们可以通过调用他的父组件来为Counter组件获取不同的标头了。
render() {
  return <div>
          <h3>{this.props.header}</h3>
          <p>current count: {this.state.count}</p>
          <button onClick={() => this.setState({ count: this.state.count + 1 })}>plus</button>
          <button onClick={() => this.setState({ count: this.state.count - 1 })}>minus</button>
        </div>
}
6.2 更改样式
样式也是如此-如果我们希望标题与父组件的配色方案匹配,我们只需要将颜色属性传递给 Counter 组件:
<Counter header="This is the Index Counter" color="rebeccapurple" />并在组件本身中添加必要的内联样式:
render() {
  return <div>
          <h3 style={{color: this.props.color}}>{this.props.header}</h3>
          <p>current count: {this.state.count}</p>
          <button onClick={() => this.setState({ count: this.state.count + 1 })}>plus</button>
          <button onClick={() => this.setState({ count: this.state.count - 1 })}>minus</button>
        </div>
}
6.3 设置默认属性
为了确保localhost:8000/counter URL 仍可以被打开,我们现在必须在Counter 组件内部定义一个默认的属性 - 如果没有父组件传递 props,则标题标记和字体颜色将是未定义的! 这可以通过 Prop-Types 完成,我们需要安装:
npm install --save prop-types现在,我们可以将其导入到/src/pages/counter.js:
import React from "react"
import PropTypes from "prop-types"并在Counter组件内(在export语句上方)为 header prop 定义一个默认值:
Counter.defaultProps = {
  header: "Default Counter",
  color: "black",
}
07 Gatsby 插件(Gatsby Plugins)
插件是实现 Gatsby API 的 的Node.js 软件包。 它们使您能够轻松解决常见的网站构建问题,例如 设置 Sass,添加 markdown 支持,过程映像等。
7.1 进度动画
在此示例中,我们要使用 NProgress.js 插件将加载动画添加到我们的网站。 您使用 npm 安装 NProgress 插件:
npm install --save gatsby-plugin-nprogress现在,我们必须告诉 Gatsby 通过编辑(在文件不存在的情况下创建)应用程序根目录内的 gatsby-config.js 文件来使用该插件。 在 在starter 模板中,我们已经安装了 react-helmet 插件(此插件如下所述:Page Layout)。 现在,只需将 gatsby-plugin-nprogress 添加到数组中:
module.exports = {
  siteMetadata: {
    title: `Gatsby Wiki`,
  },
  plugins: [
      `gatsby-plugin-react-helmet`,
    {
  {
        resolve: `gatsby-plugin-nprogress`,
        options: {
          // Setting a color is optional.
          color: `rebeccapurple`,
          // Disable the loading spinner.
          showSpinner: false,
      },
    },
  ],
}
7.2 离线支持和清单
现在,我们想在网站上添加一个 Serviceworker,以帮助我们缓存应用程序的重要部分,从而为我们提供一定程度的脱机支持-正如 Offline Plugin告诉我们的那样,我们还将安装 Manifest Plugin (请确保它是 在 Offline Plugin 之前列出!)。
    npm install --save gatsby-plugin-manifest
    npm install --save gatsby-plugin-offline
现在,将它们添加到我们的 Gatsby 配置中:
module.exports = {
  siteMetadata: {
    title: `Gatsby Wiki`,
  },
  plugins: [
      `gatsby-plugin-react-helmet`,
      {
        resolve: `gatsby-plugin-nprogress`,
        options: {
          // Setting a color is optional.
          color: `rebeccapurple`,
          // Disable the loading spinner.
          showSpinner: false,
      },
    },
    {
      resolve: `gatsby-plugin-manifest`,
      options: {
          name: "Gatsby Wiki",
          short_name: "Gatsby Wiki",
          start_url: "/",
          background_color: "white",
          theme_color: "rebeccapurple",
          display: "minimal-ui",
          icons: [
            {
              // Everything in /static will be copied to an equivalent
              // directory in /public during development and build, so
              // assuming your favicons are in /static/favicons,
              // you can reference them here
              src: `/apple-touch-icon.png`,
              sizes: `180x180`,
              type: `image/png`,
            },
          {
  {
              src: `/favicon.ico`,
              sizes: `256x256`,
              type: `image/png`,
            },
          ],
        },
      },
      `gatsby-plugin-offline`,
  ],
}
08 单页面应用(Single-Page-Application)
Gatsby 基于他的布局特性提供了一个创建 Single-Page-Applications (SPA's)的简单方法。
你可以在/src/layout 中找到 JSX 和 和CSS。我们正在使用的 Gatsby Starter,已经提供了头导航栏,该头导航栏已在 index.js 文件中定义(并带有必需的 CSS)。
您可以看到该应用程序已经使用React-Helmet作为 Gatsby 插件。
这个可重用的 React 组件将管理您对文档<head>的所有更改。 Helmet采用纯 HTML 标记并输出纯 HTML 标记。
该布局定义了<Header />组件,该组件与<Helmet />组件一起在<TemplateWrapper />内部使用。
您到目前为止所创建的页面中的所有内容,都将通过{children}标签注入到 Wrapper 中。 这样,您可以创建顶部导航栏,页眉,侧面导航和页脚,然后将其显示在所有网站上。
09 GraphQL
我们可以在应用程序的根目录下的 gatsby-config.js 内定义一些全局变量:
module.exports = {
siteMetadata: {
title: `Gatsby Wiki`,
author: `Mike Polinowski`,
description: `Trying out Gatsby`,
},
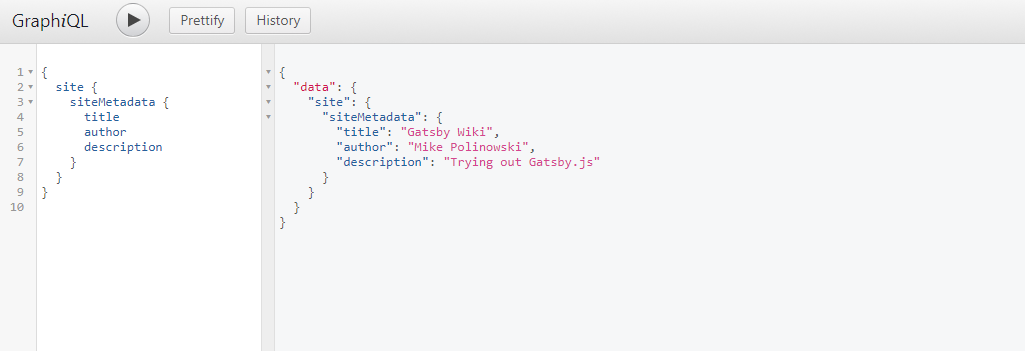
}该数据将可用于每个页面,并可使用 GraphQL 查询。 只需将以下 GraphQL 查询添加到/src/pages/index.js,即可保留这些值:
export const query = graphql`
  query FirstQuery {
    site {
      siteMetadata {
        title
        author
        description
      }
    }
  }
`然后,我们需要将此{data}注入父组件<IndexPage />:
const IndexPage = ({data}) =>现在我们可以查询组件内部的这些数据:
<h1>{data.site.siteMetadata.description}</h1>为什么是 data.site.siteMetadata?Gatsby 的 的graphql 调试器在 http://localhost:8000/___graphql上运行,您也可以使用它来测试查询并查看结果。
只需打开调试器,然后尝试我们先前的查询: