Gatsby基础知识(下)
这篇文章主要是翻译和记录了一些 Gateby 的基础知识,有助于开发者通过这些基础知识进行快速的开发
Refer to the Article: https://mpolinowski.github.io/gatsby-js-knowledgebase
10 添加文件数据(Adding File Data)
使用 Gatsby,您可以使用 GraphQL 直接从文件中查询数据。 Transformer插件将文件节点转换为各种其他类型的数据,例如 gatsby-transformer-json 将 将JSON 文件转换为 JSON 数据节点,而 gatsby-transformer-remark 将 将markdown 文件转换为 MarkdownRemark 节点,您可以从中查询 Markdown 的 的HTML 表示形式。
在这里,我们将使用gatsby-source-filesystem从我们的文件系统创建文件节点。
npm install --save gatsby-source-filesystem安装后,将插件添加到 gatsby-config.js。 您可以具有此插件的多个实例,以从文件系统上的不同位置读取源节点。
以下设置了 Jekyll 模式:具有 Markdown 文件的页面目录和.json,.yaml,.csv 的数据目录:
{
resolve: `gatsby-source-filesystem`,
options: {
name: `pages`,
path: `${__dirname}/src/pages/`,
},
},
{
resolve: `gatsby-source-filesystem`,
options: {
name: `data`,
path: `${__dirname}/src/data/`,
},
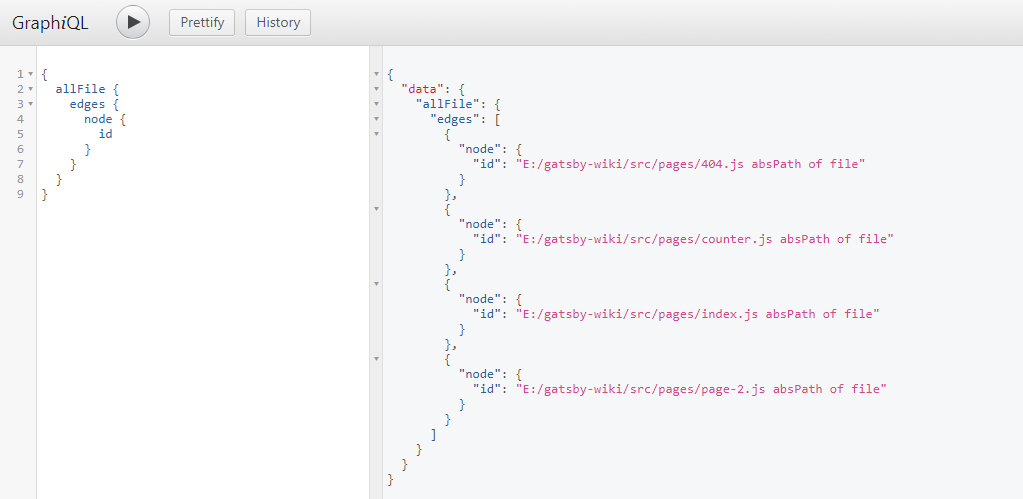
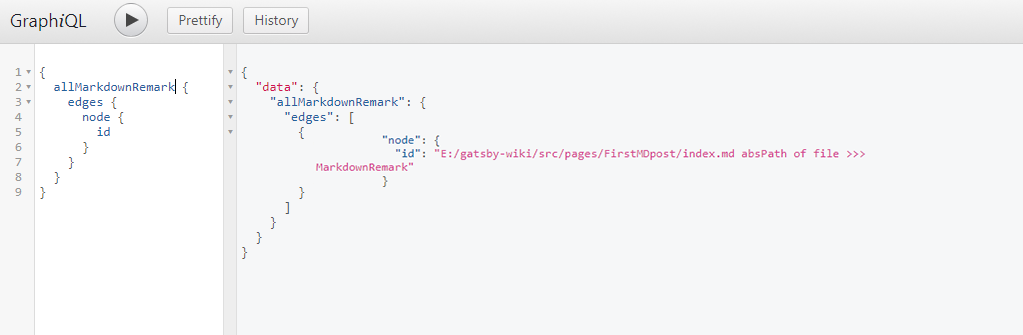
}现在,您可以打开 GraphiQL 调试器-在大括号中,当你开始键入 allFiles 时,它应提供自动补全功能。 只需按 Enter 接受,然后再次按 CTRL + ENTER 填写所有页面 ID 的查询:
{
    allFile {
      edges {
        node {
          id
        }
      }
    }
}
当你删除 ID 并按 CTRL + SPACE 时,将显示一个包含所有可查询选项的下拉菜单: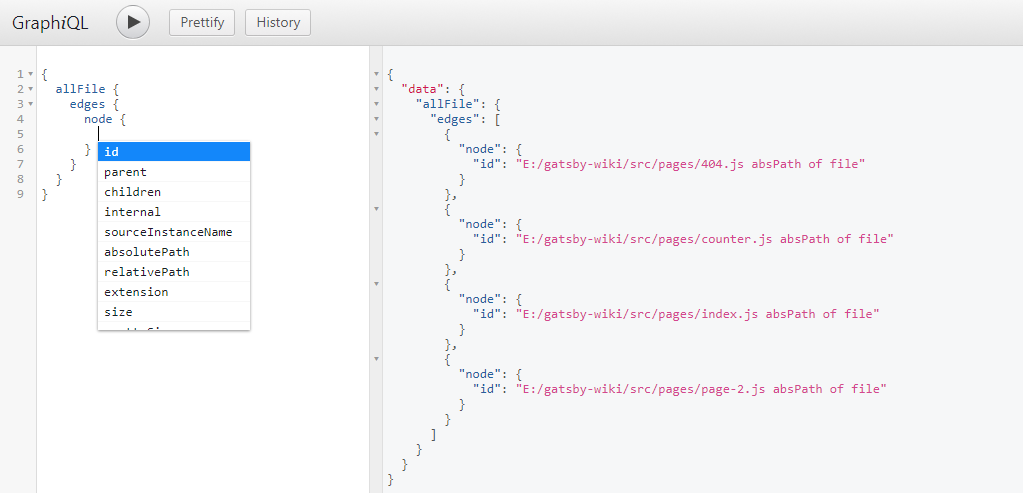 你可以使用 parent,children 和 和relativePath 属性来创建, 例如 breadcrumb navigation:
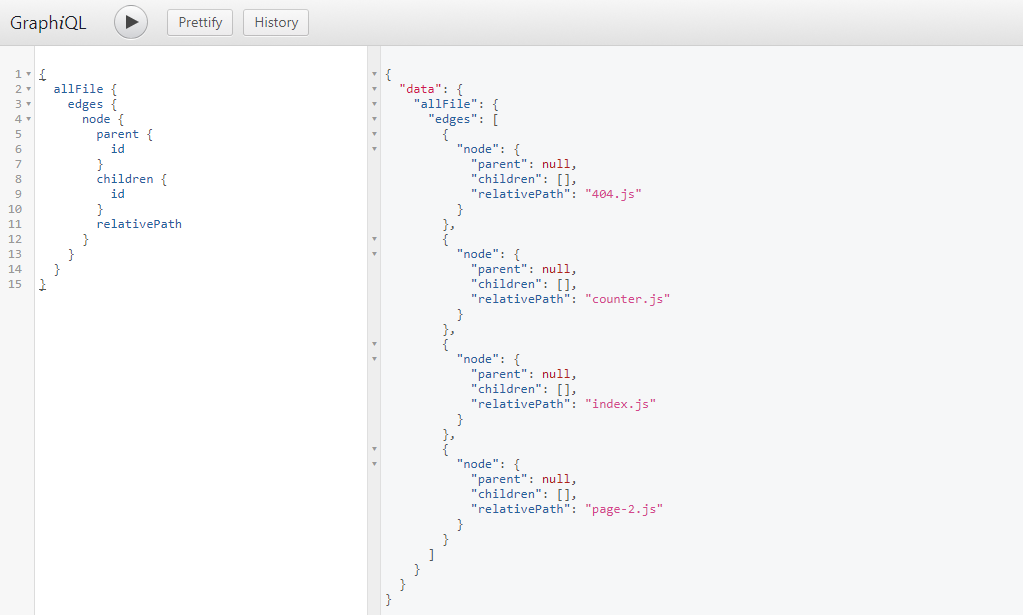
现在,我们可以在/src/pages/page-2.js 中添加 GraphQL 查询,以遍历我们的所有页面并显示一些数据:
export const query = graphql`
  query MyFilesQuery {
    allFile {
      edges {
          node {
            relativePath
            prettySize
            extension
            birthTime(fromNow: true)
        }
      }
    }
  }
`不要忘记将{data}注入页面组件:
const SecondPage = ({data}) =>现在,我们可以添加一些 JSX 来遍历所有文件,并在<table>中输出信息
<table>
  <thead>
    <tr>
      <th>relativePath</th>
      <th>prettySize</th>
      <th>extension</th>
      <th>birthTime</th>
    </tr>
  </thead>
  <tbody>
    {data.allFile.edges.map(({ node }, index) => (
      <tr key={index}>
        <td>
          {node.relativePath}
        </td>
        <td>
          {node.prettySize}
        </td>
        <td>
          {node.extension}
        </td>
        <td>
          {node.birthTime}
        </td>
      </tr>
    ))}
  </tbody>
</table>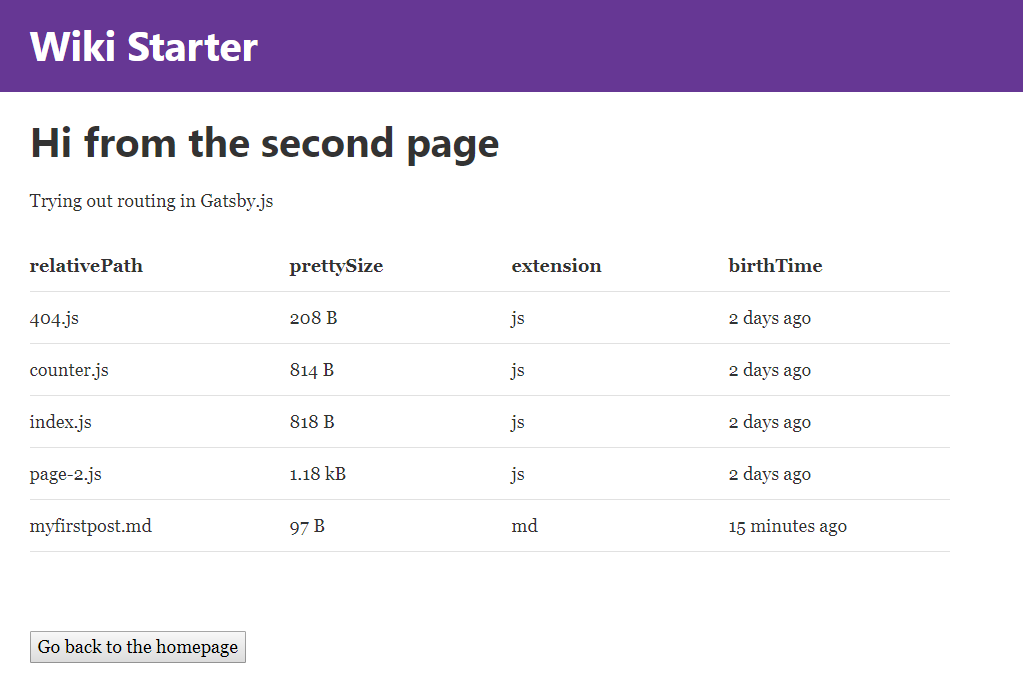
11 使用 Markdown(Working with Markdown)
11.1 添加 Markdown 到 GraphQL
现在,我们可以访问有关我们所有页面的信息。 但是如上所述,在最后一段的开头,我们还可以使用 Gatsby Transformer Plugins 来查找文件并将其内容可以通过 GraphQL 查询。 这里,我们希望使用 Markdown 文件并对其进行转换,以便能够在我们的网站上显示其内容。 为此所需的 Transformer Plugin 是 gatsby-transformer-remark。 首先,我们需要安装插件:
npm install --save gatsby-transformer-remark在 gatsby-config.js 中添加:
plugins: [
  `gatsby-transformer-remark`,
]
然后在/src/pages/FirstMDpost/index.md 内创建一个 markdown 页面,其中包含一些 FrontMatter(文件开头的元数据,以后可以由 GraphQL 查询)和一些文本:
---
path: '/md-posts'
title: 'My first Post'
date: '2017-10-05'
author: 'Mike Polinowski'
chapter: 'Index'
---
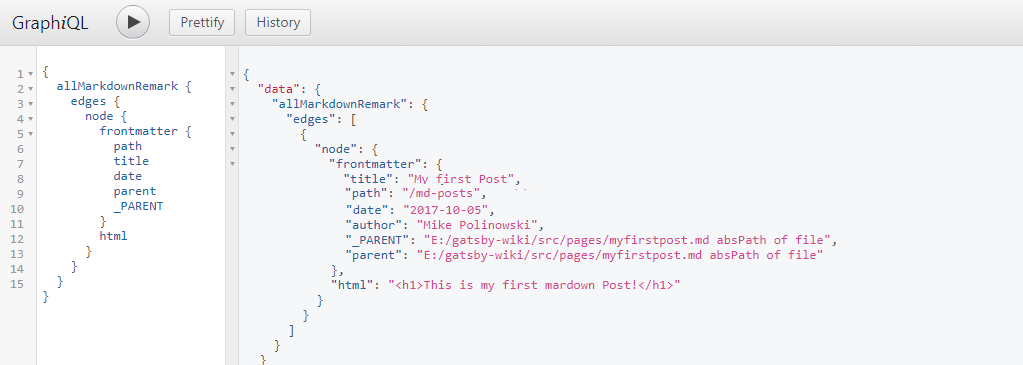
# This is my first mardown Post!现在我们为 GraphQL 提供了 Markdown -与以前一样,只需开始输入 allMardownRemark(ENTER 自动完成),然后按 CTRL + ENTER 完成查询:

现在,我们可以查询 FrontMatter 以及添加到页面文件夹中的每个 MD 文件的 MD 转换为 HTML 的内容:
11.2 发布我们的 Markdown 数据模板
这些 Markdown 表示将要被显示的模板,但是现在我们需要创建一个用于此数据的样式模板。让我们先在/src 内添加一个称为templates的文件夹。 现在,向其中添加一个名为post.js的文件,该文件将包含每个帖子条目的结构模板。 该文件包含我们帖子的 JSX markup:
import React from 'react'
export default function Template({data}) {
  const {markdownRemark: post} = data

  return (
    <div>
      <h1>{post.frontmatter.title}</h1>
      <div dangerouslySetInnerHTML={{__html: post.html}} />
    </div>
  )
}
export const postQuery = graphql`
  query BlogPostByPath($path: String!) {
    markdownRemark(frontmatter: { path: { eq: $path} }) {
      html
      frontmatter {
        path
        title
      }
    }
  }
`
<Template />组件接收{data}属性,这些属性由 GraphQL 查询检索。
该查询会查找 markdown 中 中frontmatter 里面所有 URL 等于$Path 的帖子,所以如果你在浏览器中键入的这个 URL 是/md-posts,那么路径中带有/md-posts 的文件,就会被调用。
然后,查询使用 markdownRemark 插件将 post markdown 转换为 HTML,并在{data}中提供其前题的路径和标题,并将其传递到组件,然后渲染。
Gatsby 已经配置为将/src/pages 中的所有页面路由为我们网站的页面。 但是现在我们必须注册来自 markdown 文件和 post.js 模板的帖子。 为此,我们必须在应用程序的根目录内创建一个名为 gatsby-node.js 的文件。 我们将使用createPages Gatsby API从我们的帖子模板创建页面:
const path = require('path');
exports.createPages = ({boundActionCreators, graphql}) => {
  const {createPage} = boundActionCreators;
  // const createPage = boundActionCreators.createPage;
  const postTemplate = path.resolve('src/templates/post.js');
  return graphql(`{
    allMarkdownRemark {
      edges {
        node {
          html
          id
          frontmatter {
            path
            title
          }
        }
      }
    }
  }`)
  .then(res => {
    if(res.errors) {
      return Promise.reject(res.errors);
    }
    res.data.allMarkdownRemark.edges.forEach(({node}) => {
      createPage({
        path: node.frontmatter.path,
        component: postTemplate
      })
    })
  })
}
保存并重新启动您的应用程序,然后在浏览器中打开 http://localhost:8000/md-posts
11.3 带有 Markdown 的嵌套路由
要为./src/pages/FirstMDpost/index.md 文件创建子帖子,我们可以简单地向文件夹中添加更多文件,并在其前题中定义嵌套路由 - e.g. ./src/pages/FirstMDpost/myfirstpost.md:
---
path: '/md-posts/first-post'
title: 'First Blog Post'
date:   '2017-10-05'
author: 'Mike Polinowski'
chapter: 'Markdown Posts'
---
# This is my first markdown Post!
和 ./src/pages/FirstMDpost/mysecondpost.md:
---
path: '/md-posts/second-post'
title: 'Second Blog Post'
date:   '2017-10-05'
author: 'Mike Polinowski'
chapter: 'Markdown Posts'
---
# A dive into Markdown Syntax它们可以分别通过http://localhost:8000/md-posts/first-post和http://localhost:8000/md-posts/second-post 来访问
11.4 创建 Index 页面
现在,我们可以使用 GraphQL 检索所有 Markdown 页面并将过滤它们。 对于此测试,我们将一个表添加到起始页面,显示最后 10 个帖子(到目前为止,我只发表了 3 3个帖子...),我们希望按日期降序排列它们,并且仅显示 chapter: 'Markdown Posts'的页面 ,并排除我们的 index.md:
const IndexPage = ({data}) => (
<div>
<h2>Markdown Index</h2>
<p>The table below sorts out all Markdown pages that are not inside the "Markdown Posts" chapter - as defined inside their frontmatter. It also applies a filter, to only display the latest 10 posts. Click on here to display
<Link to="/md-posts/">
all Markdown pages
</Link>
.</p>
<table>
<thead>
<tr>
<th>Date</th>
<th>Link</th>
</tr>
</thead>
<tbody>
{data.allMarkdownRemark.edges.map(post => (
<tr key={post.node.id}>
<td>
{post.node.frontmatter.date}
</td>
<td>
<Link
to={post.node.frontmatter.path}>
{post.node.frontmatter.title}
</Link>
</td>
</tr>
))}
</tbody>
</table>
</div>
)
export const pageQuery = graphql`
query IndexQuery {
allMarkdownRemark(limit: 10
sort: {fields: [frontmatter___date], order: DESC}
filter: { frontmatter: { chapter: {eq: "Markdown Posts"} }}
) {
edges {
node {
id
frontmatter {
path
title
date
}
}
}
}
}
`11.5 缓存 Markdown 中的链接
一旦开始在 Markdown 文件中添加链接,您会发现单击它们会重新加载您的应用程序-这不是很好 :( 但请放心,这里的gatsby-plugin-catch-links可以助您一臂之力! 它-安装后,将其添加到./gatsby-config.js 中的 Gatsby 插件中,它就可以正常工作:
npm install --save gatsby-plugin-catch-links// In your gatsby-config.js
plugins: [
`gatsby-plugin-catch-links`,
]12 添加 Material-UI
为了使我们的生活更轻松,我们希望包含来自@ Materials-UI 的即用型 material 设计组件。 我们将安装 v.1.0.0 的测试版-它也需要 Roboto Fontface 和 和Material-UI 图标:
    npm install material-ui@next --save
    npm install typeface-roboto --save
    npm install material-ui-icons --save
现在,我们可以轻松地将 Material-UI 组件导入我们的应用程序:
import React from 'react'
import { render } from 'react-dom'
import Button from 'material-ui/Button'
import 'typeface-roboto'
function AppWithButton() {
  return (
    <Button>
      Hello World
    </Button>
  );
}
render(<AppWithButton />, document.querySelector('#app'));
13 添加 Elasticsearch
该项目的先决条件之一是,我们需要为我们的 ElasticSearch Index 创建一个闪电般的界面。 我们已经为其构建了ES6 Class component。并将其添加到 Gatsby/Material-UI 中非常简单。
首先,添加./src/pages/search/jsx 并修改 ElasticSearch 组件来配合我们的 UI.
import React, { Component } from 'react'
import Link from 'gatsby-link'
import elasticsearch from 'elasticsearch'
import { withStyles } from 'material-ui/styles'
import Grid from 'material-ui/Grid'
import Button from 'material-ui/Button'
import ResultCards from '../components/ResultCards'
const connectionString = 'localhost:9200'
const _index = 'wiki2_de_2017_09_09'
const _type = 'article'
let client = new elasticsearch.Client({
host: connectionString,
log: "trace"
})
const rootStyle = {
flexGrow: 1,
marginTop: 30,
}
export class Search extends Component {
constructor(props) {
super(props)
this.state = { results: [] };
this.handleChange = this.handleChange.bind(this)
}
handleChange(event) {
const search_query = event.target.value;
client.search({
index: _index,
type: _type,
body: {
query: {
multi_match: {
query: search_query,
fields: ['title^100', 'tags^100', 'abstract^20', 'description^10', 'chapter^5', 'title2^10', 'description2^10'],
fuzziness: 1,
},
},
},
}).then(function(body) {
this.setState({ results: body.hits.hits });
}.bind(this),
function(error) {
console.trace(error.message);
}
);
}
render() {
return (
<div className="container">
<input type="text" onChange={this.handleChange} />
<SearchResults results={this.state.results} />
</div>
);
}
}
const SearchResults = ({results}) => (
<div className="search_results">
<br/><hr/>
<div className={rootStyle}>
<Grid container spacing={24}>
{results.map((result , i) =>
<ResultCards key={i}
image={result._source.image}
title={result._source.title2}
link={result._source.link}
abstract={result._source.abstract}/>
)}
</Grid>
</div>
<br/><br/><Link to="/" style={{ textDecoration: 'none' }}><Button raised color="primary">Go back to the homepage</Button></Link>
</div>
)
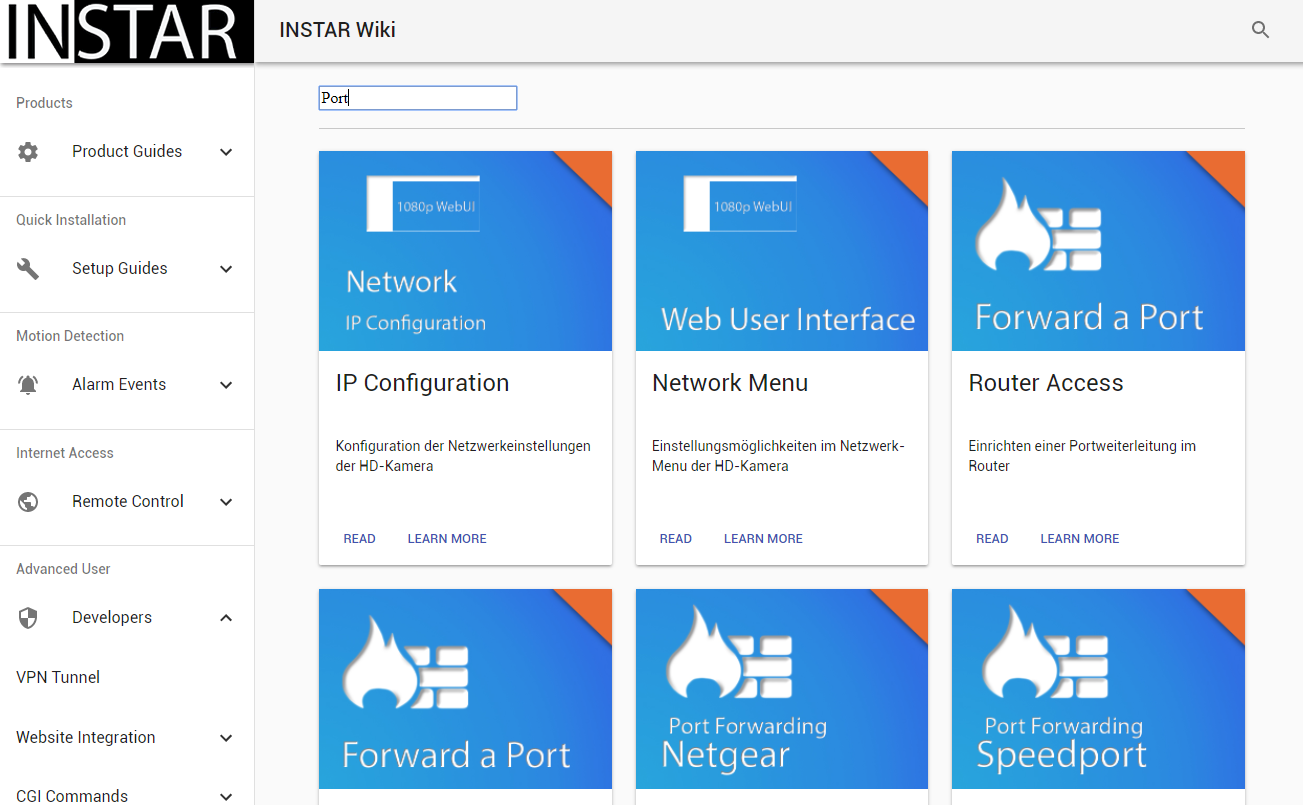
export default Search<SearchResults />组件将遍历<ResultCards />组件内的 Material UI Card:
import React from 'react'
import Link from 'gatsby-link'
import Card, { CardActions, CardContent, CardMedia } from 'material-ui/Card'
import Button from 'material-ui/Button'
import Typography from 'material-ui/Typography'
import Grid from 'material-ui/Grid'
const ResultCards = ({image, title, abstract, link}) => (
    <Grid item xs={12} sm={6} lg={4}>
      <Card style={{ maxWidth: 345 }}>
        <CardMedia
          style={{ height: 200 }}
          image={image}
          title={abstract}
        />
        <CardContent>
          <Typography type="headline" component="h4" style={{ minHeight: 60, marginBottom: "10px" }}>
            {title}
          </Typography>
          <Typography component="p" style={{ minHeight: 50, marginBottom: "10px" }}>
            {abstract}
          </Typography>
        </CardContent>
        <CardActions>
          <Link to={link} style={{ textDecoration: 'none' }}>
            <Button dense color="primary">
              Read
            </Button>
          </Link>
          <Button dense color="primary">
            Learn More
          </Button>
        </CardActions>
      </Card>
    </Grid>
)
export default ResultCards
组件将添加来自 ElasticSearch JSON Response 的结果,并给我们一个灵活的卡片网格。